Speedo Theme - responsive Shopify theme user guide

FEATURES:

  • Cross sell products
  • Frequently bought together
  • Direct to checkout
  • Related products
  • Countdown Timer
  • Inventory quantity bar
  • Social proof Pop up
  • Color Swatch
  • Ajax Filter
  • Infinite Scroll
  • Live Sales Notification
  • Smart Newsletter Popup
  • Four Type Collection Layout
  • GDPR compliance bar
  • Delivery time
  • Quick view Smart
  • Search suggestions
  • Free + Shipping optimized
  • Smart Mega Menu
  • Mini - Cart with Drawer
  • Add to Wishlist
  • Product Reviews
  • Unlimited Languages
  • Unlimited Currency
  • Size Guide Pop up
  • 10 Product Page Layout

Main information

DO NOT HAVE STORE YET?

Use these affiliate link to get free installation service. We are ready to process our theme installation after your regular payment to Shopify.

Free installation service includes:

  1. Theme installation
  2. Required app installation. Reviews (Other apps may need an additional fee).
  3. Import demo settings
Attention:
The FREE installation service is available only for NEW stores which were created through our affiliate link with paid Shopify account.

Theme Install

To install chosen Theme, please follow the instructions below:

Attention:
Theme with the word -shopify-2-0 in the file name in folder from themeforest will support the functionality of the Shopify 2.0 admin panel
  1. Upload the theme in your store Official Documentation
  2. Publish the theme
  3. Configure the global theme settings. *REQUIRED

UPLOAD AND PUBLISH THEME:

How to add Speedo theme to your store?

  1. Click the Online Store
  2. Click the Add theme and choose the upload zip file and upload the theme
  3. Click a Actions and choose the Publish

Required settings

Configure payments

  • From your Shopify admin go to Settings / Payments
  • Choose a payment gateway to accept payments for orders. The checkout page will works.

OFFICIAL PAYMENTS DOCUMENTATION

ENABLE ACCOUNTS

To enable account from your Shopify admin panel you need to:

  • Open settings and choose “Checkout option”
  • Find the block "Customer accounts" and select "Accounts are optional"
  • Click "save"


Also for more information we recommend you to follow the link below:

OFFICIAL ACCOUNTS DOCUMENTATION

Theme Settings


Also for more information we recommend you to follow the link below:

OFFICIAL theme Settings DOCUMENTATION

Colors

Please refer to the attached screenshot and you can change the color in the text, button, and image overlay in the customization.


Theme Color Change in Customization

  1. This is for headings and links, body text, and sale price color changes
  2. This is for button background and text color and hover background and text color change
  3. This is to change the text color, border color and background color in the form fields
  4. The text above this image and the opacity on the image overlay are for changing the background
  5. This is to change the colors in the borders and lines and body background

Typography

To change the font family in your store, see the attached screenshot


To change the font family in body, heading and button text and these are Shopify's default fonts

Mega Menu

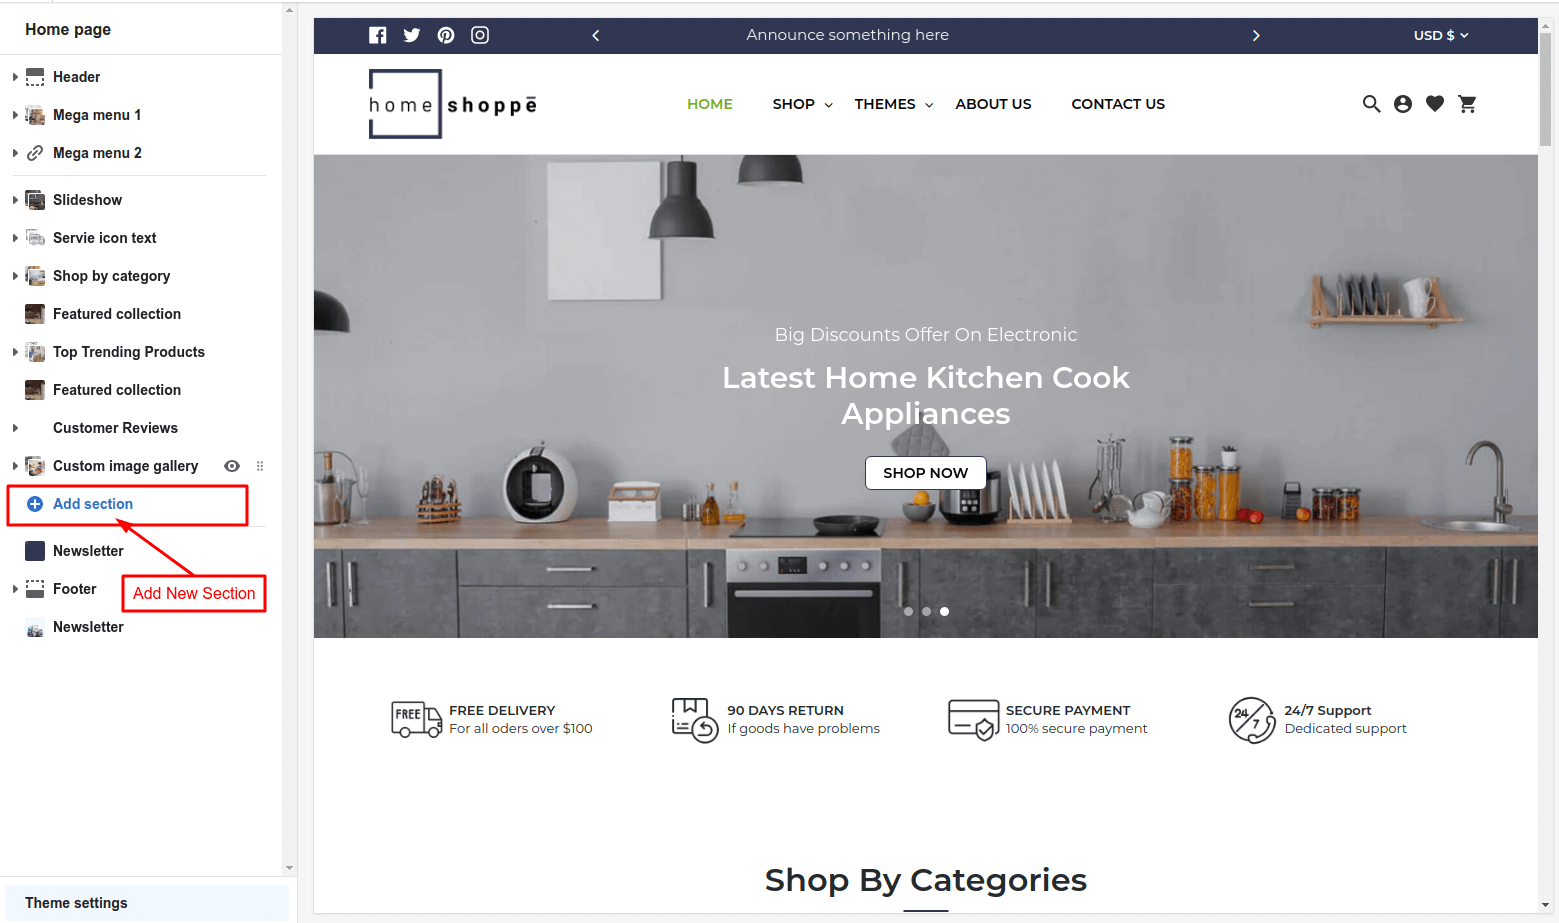
The Speedo theme has 6 mega menus, see the attached screenshot

  1. Click on the "Customize" button and open: Theme settings > 'Mega Menu'
  2. A screenshot below is attached to edit this


Choose one of these mega menus and click the save button, so it will add to the theme, see the attached screenshot


  1. The menu to display the mega menu add the name of that menus to the Link title
  2. Select one from the Menu Content size 'box view' and 'full view'

All the blocks shown in the screenshot attached below have been added to the mega menu


1. Collection Product

  1. Select a Product Collection
  2. Select product range from 1 to 5
  3. Add Button Title
  4. Add Button URL
  5. Choose a block width between 20% to 100%

2. Collection Menu


  1. Select a Navigation Menu in Select Linklist
  2. Choose a block width between 20% to 100%

3. Collection Top Banner


  1. Select Image
  2. Enter the link in Image Url
  3. Select a Navigation Menu in Linklist
  4. Choose a block width between 20% to 100%

4. Collection Bottom Banner


  1. Select a Navigation Menu in Linklist
  2. Select Image
  3. Enter the link in Image Url
  4. Choose a block width between 20% to 100%

5. Coll Banner with title


  1. Select Image
  2. Enter Title
  3. Enter the link in Image Url
  4. Choose a block width between 20% to 100%

6. Coll Banner


  1. Select Image
  2. Enter the link in Image Url
  3. Choose a block width between 20% to 100%

7. Single product


  1. Select Product
  2. Choose a block width between 20% to 100%

Product Notification Popup


  1. Click on the "Customize" button and open: Theme settings > 'Product Notification popup'
  2. A screenshot below is attached to edit this

  3. Show or Hide Product Notification?
  4. Show or Hide Notification in Mobile
  5. Select the collection you want to display in the product notification pop up here
  6. Enter the Title
  7. Show or Hide Fake Time?
  8. Enter the Time Text
  9. Enter the Location text
  10. Enter the Fake Location Ex:- Sigapore | New York | Dubai | Paris etc...
  11. Enter the Delay Time
  12. Enter the Display Time
  13. Choose Background Color and text Color

Mini Cart


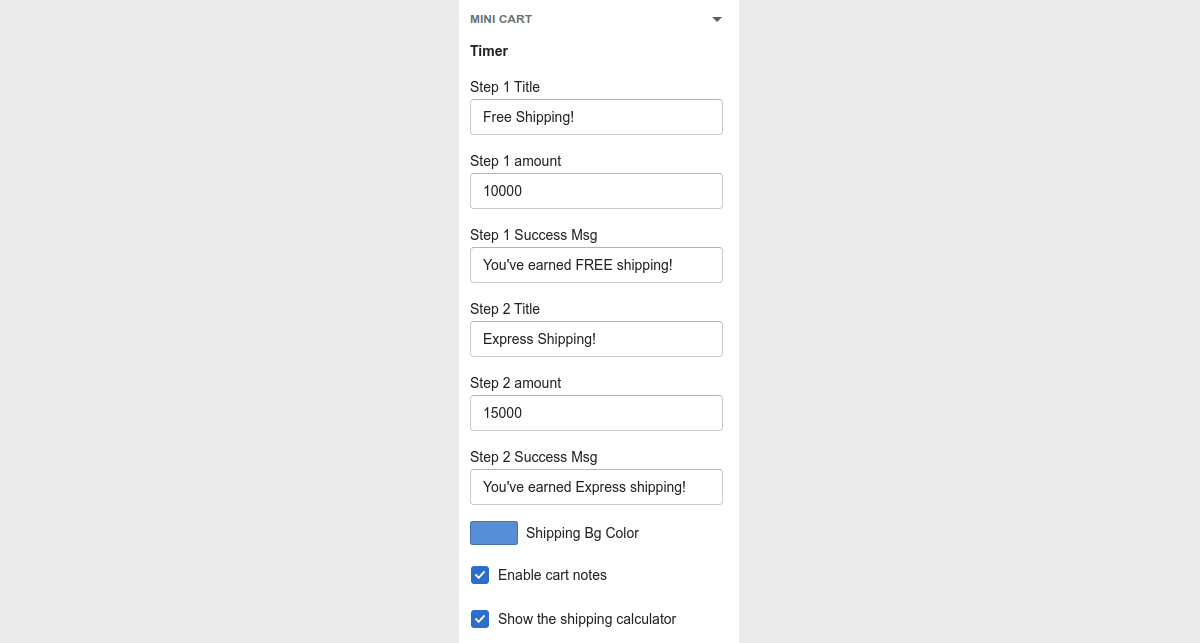
  1. Click on the "Customize" button and open: Theme settings > 'Mini Cart'
  2. A screenshot below is attached to edit this

  3. Enter the Step 1 Title
  4. Enter the Step 1 amount
  5. Enter the Step 1 Success Msg
  6. Enter the Step 2 Title
  7. Enter the Step 2 amount
  8. Enter the Step 2 Success Msg
  9. Select Shipping BG Color
  10. Enable/Disbale Cart Note
  11. Enable/Disbale Shipping Calculator

Cart Note


  1. Click on Edit Order Note and then the Cart Notice popup will open
  2. Enter the text in Add a note to your Note

Cart Shipping Estimates

This is also included in cart page


  1. Click on Edit Estimate Shipping and then the Get shipping estimatespopup will open
  2. Select Country
  3. Select State
  4. Enter The Zip/Postal Code
  5. Click Calculate Shipping and then a screenshot is attached below for show calculate shipping


  1. Click on the "Customize" button and open: Theme settings > 'Shipping Rates Calculator'
  2. A screenshot below is attached to edit this


  1. Click on the "Customize" button and open: Theme settings > 'Cookie Popup'
  2. A screenshot below is attached to edit this

  3. Enter the Cookie Content
  4. Enter the Cookie Privacy Title
  5. Enter the Cookie Privacy URL
  6. Enter the Cookie Button Title
  7. Select Button Color
  8. Select Button Hover Color
  9. Select Cookie Position in Left, Right & Full Width

Social media

Also for more information we recommend you to follow the link below:

OFFICIAL Social media DOCUMENTATION

Favicon Icon

Also for more information we recommend you to follow the link below:

OFFICIAL favicon DOCUMENTATION

Checkout

This section lets you customize your store's checkout. Refer to Shopify checkout  for more information about your store's checkout page.

Header

At this time with Speedo theme, we offer you fully customized header.

Announcement bar:


You can add an announcement bar in the header that you can use to show a message to your customers. Your message is customizable and might include contact information, information about store events or sales, or a store slogan.

  1. Announcement bar at top of the header.
  2. You can add many Announcement text inside it and it will shows like slider at the top of main header.

Header Settings

  1. There is an option for customizing your header using the above options. like, move logo positions, show/hide elements like social icons, currency selector, language selector.
  2. Option to set announcement bar only for the homepage.
  3. Option to set navigation items labels like new, sale also there is an option for navigation color change.

Navigation

  1. To create any navigation you need to go inside Shopify admin at "Online Store >> Navigation >> Add Menu".
  2. Select that navigation inside customize to show inside header.
  3. Inside the above screenshot we have selected two menus one is for desktop and one is for mobile.

Home Page Content

At this time with Speedo theme, we offer you many sections.

Home page Section Settings


To access the page editor, click Online store on the left sidebar of the admin panel. The Themes page will load. The first thing shown on the page is the Current theme. To edit the home page, click Customize


Add Home page section


From here you can add as many sections as you like to the home page of your website

All these sections you can add in your site

  1. Slideshow
  2. Servie icon text
  3. Shop By Category
  4. Featured Collection
  5. Customer Reviews
  6. Custom image gallery
  7. Logo List
  8. Video
  9. Custom Content
  10. Blog Posts
  11. Collection List
  12. Image with text overlay
  13. Gallery
  14. Collection List
  15. Blog Posts

Create collection

Please check the documentation below before you start working on the collection creating

Building product collections - official documentation

Add Collection

  1. To create any collection you need to go inside Shopify admin at "Products >> Collections >> Create collection".

Also for more information we recommend you to follow the link below:

OFFICIAL Collection DOCUMENTATION

Listing Collection Page


Collection List Page Section Settings

  1. To access the page editor, click Online store on the left sidebar of the admin panel. The Themes page will load. Then click Customize.
  2. Click on the home page at the top and select the collection list from there

Product Collection Page


Speedo theme is provided 4 types of collection page

  1. Left Sidebar
  2. Right Sidebar
  3. Full Width Sidebar
  4. Grid Layout

Left Sidebar


Right Sidebar


Full Width Sidebar


Grid Layout


Collection Page Section Settings

  1. Choose a template and left Site click the Collection Page
  2. A screenshot below is attached to edit this

    Top Bar Hide and show and add icon with text in Product List Page


  3. Select Layout in Product Collection page


  4. Products per row (grid only):- Choose how many products to keep in one row in Product List Page
  5. Rows per page (grid only):- Select how many rows in this page in Product List Page
  6. Enable/Disable in Product Collection Main Image in Product List Page
  7. Enable/Disable Product Vendors in Product List Page
  8. Enable/Disable Add To cart Button in Product List Page
  9. Enable/Disable Swatch Image in Product List Page
  10. Add Filter BG Color in Product List Page
  11. Add Filter Text Color in Product List Page
  12. Add Filter Title BG Color in Product List Page
  13. Add Filter Title Text Color in Product List Page
  14. Enable/Disable 'AND' operator in a group filter in Product List Page
  15. Enter your tag's prefix,separate by comma ie: color,size,brand,price..

    How to Show color, size, brand, and price in Filter on the product listing page is shown below.

  16. Add Sidebar Bar Banner

  17. Enable/Disable sorting in Product List Page

Add Filter Tag In Product

  1. To add a filter tag to any product you need to go inside the Shopify admin at "Products >> Add Product or Choose Product"
  2. Then will look like this

  3. Click on Manage so that a pop-up will open and all the tags in it will appear, click on any of them and it will be added to the tag.
  4. If you want to add more tags than this and show it in the filter, you have to add a tag like this, ex:- Color_Blue, Brand_Speedo, Price_15 to 20, Size_S, etc...
  5. Ask a question? If you want to add this to the product, add the ask_question tag to the product
  6. Size Guide If you want to add this to the product, add the sizeguide tag to the product

Create Product

Before you start adding products to your store we recommend you to check information by the link below:

Products - official documentation

After adding all the details to the product, the online store gives you the option to choose the product template in the theme template. When you add a new product, the default product will be selected. This means that the default product in the Speedo theme will be Product Layout 1 and you can choose from many other layouts online store for example: - Layout 2, Layout 3, Layout 4, etc...

Add product variants

Variants - official documentation

You may add in the product all supported variants by default: size, color, material

This options will work with: product item, quick view, product page

Product page settings

GO TO CUSTOMIZE THEME. OPEN PRODUCT PAGE. EDIT PRODUCT PAGE SECTION:


There are 10 types of product templates in the speedo theme.

  1. Default Product layout1 :- Product Layout1 Link
  2. Product  layout2 :- Product Layout2 Link Link
  3. Product  layout3 :- Product Layout3 Link
  4. Product  layout4 :- Product Layout4 Link
  5. Product  layout5 :- Product Layout5 Link
  6. Product  layout6 :- Product Layout6 Link
  7. Product  layout7 :- Product Layout7 Link
  8. Product  layout8 :- Product Layout8 Link
  9. Product  layout9 :- Product Layout9 Link
  10. Product  pre-order :- Product Layout10 Link

Product Page settings

  1. Choose any layout from the product layout and click on the product pages on the left side then the screenshot shown below on the right side will show there.

  2. Show quantity selector:- Show or hide quantity on product page
  3. Product Availability Status:- Show or hide In Stock and out stock on product page
  4. Product Next Prev:- Show or hide Next and Prev button on product page
  5. Viewer Count:- Show or hide Viewer Count on product page
  6. Stock Bar:- Show or hide Stock Bar on product page
  7. Time Countdown:- Show or hide Time Countdown on product page
  8. Show vendor:- Show or hide vendor on product page
  9. Show dynamic checkout button:- Show or hide dynamic checkout button on product page
  10. Show social sharing buttons:- Show or hide social sharing buttons on product page
  11. Variant Box:- Choose the one option on product page:- Swatch for Dropdown

Add Metafields in Product

Add Tab Title and Content in Product


There are 2 types of tab designs in product layout. You have to choose product layout for the design you want to keep from these 2. In the screenshot below it is the design of 2 tabs.

Product Tab designs 1


This design will appear in all these layouts 1, 2, 7, 9


Product Tab designs 2


This design will appear in all these layouts 3, 4, 5, 6, 8, 10


How to add Tab Title and Content in Product?

  1. To add a Tab Content to any product you need to go inside the Shopify admin at "Products >> Add Product or Choose Product"
  2. And scroll down so that the Metafields option appears and click on the View All button to the right.
  3. Then a new page will open and it will have all the options of Metafields
  4. And it will also show an option like the screenshot below

  5. Add 4 tab title and tab content to all product

Product left and right image and content

  1. To add another meta field to any product you need to go inside the Shopify admin at "Products >> Add Product or Choose Product"
  2. And scroll down so that the Metafields option appears and click on the View All button to the right.
  3. Then a new page will open and it will have all the options of Metafields
  4. And it will also show an option like the screenshot below

  5. Add an image and text to it and then go to the customized theme to show it in the product and find the product in which you have added a metafield and click on 'Ad section' on the left side and add a section in "Image with text". See screenshot below

  6. Click in save button

Frequently Bought Together


  1. To add a Tab Content to any product you need to go inside the Shopify admin at "Products >> Add Product or Choose Product"
  2. And scroll down so that the Metafields option appears and click on the View All button to the right.
  3. Then a new page will open and it will have all the options of Metafields
  4. And it will also show an option like the screenshot below

  5. The first product will be the main product and for the other two products you add, you have to add the handle of that product, and add a compulsory comma(,) between them to add two handles.
  6. How to show it in the product after adding handles to It shows the following screenshot

Create a page

Please note, before the set up Theme must be published!
More information you may find at the link below

CREATE A PAGE - OFFICIAL DOCUMENTATION

Create a blog

We recommend you to look at the information below before you start working on your blog.

Blog - official documentation